Simpler 640g Nightscout setup
Nothing stays still for long when #WeAreNotWaitingWhilst I've been working on improving the scripting behind the scenes, Tom Collins, T1D-Dad extraordinaire, came up with a plan to gather some of existing 640g NS layers into one tidy .NET application. We think the two components now work a treat - what do you think?

So here's what we've done:
- Removed the need to run Firefox, Selenium and the mouse clicker (take a bow Tom!)- Improved latency between polling the pump for fresh data
- Improved VirtualHere stability with the Bayer Contour Next 2.4 (if you're running on a Pi or similar; I'll put up a separate post on that)
- Enable the process to run minimised, allowing your PC to be used for other things (like full screen Nightscout display :) )
And here's what's not been tackled with this release:
- The CareLink bounce is still required at the moment- You still need to install Nightscout*
- This is still a two-part solution if mobility is required (a battery-powered phone or mini-pc and a Windows back-end)
- Some issues remain (see below)
*I know this might sound obvious to some, but installation of the generic Nightscout website, with the Azure and mlabs back-end, is still required but is not trivial - around a half of all the support messages I've taken on getting the 640g onto Nightscout have been related to the core Nightscout installation and not connected to the 640g add-ons. I'm afraid there's nothing I can do about those steps, but the instructions are first class thanks to the amazing contributors and writers who've pulled them together.
Please Be Careful
The same level of limitation of use and caution with other Nightscout solutions apply:All information, thought, and code described here is intended for informational and educational purposes only.
Use of code from Github is without warranty or support of any kind.
Each element of the system can fail at any time rendering the system unusable.
There is no password protected privacy or security provided by these tools; all data you upload can be available for anyone on the Internet to read if they have your specific URL to view your data.
Do not use any of this information or code to make medical decisions.
Connecting and using the Bayer meter via your mobile phone/any other unsupported device may damage your phone and/or the Bayer meter!
Although you are just replicating a conventional pump upload and report download from CareLink, automating this process may breach your User Agreement with Medtronic for the use of their CareLink site.
Every time you upload to CareLink, your CareLink DB (and CSV file if you use that elsewhere) becomes bloated by ~180 lines of summary information: that quickly mounts up. The long term impact of that on your CareLink data is unknown.
Troubleshooting and Known Issues/Potential Problems
CareLinkPlease remember, this setup is completely reliant on the Medtronic CareLink service and its servers as well as connectivity to Nightscout: you need to be able to get reliable data access to CareLink for this to work.
Pump and sensor glucose data transfers are limited in an identical way to the usual CareLink upload: the transfer will fail if the pump is “busy” e.g. a temp basal or dual/square wave bolus is ongoing.
Because of the extra bounce to and from CareLink, there is always around a 5 minute delay in getting sensor—and other data—up to Nightscout, and you should expect Nightscout to read one or two sensor data points behind what the pump is reading at a given time.
Insulin-On-Board
Warning: Square/Dual Bolus Insulin is currently marked at the end of the bolus period, i.e., IOB will be under-estimated during a dual/square bolus and over-estimated at the end of the the bolus onward.
SmartGuard
The end of a user defined temporary basal during SmartGuard will cause Nightscout to register a return to regular basal delivery, even if SmartGuard is still active.
Regional Settings
The CSV reports must use the comma separator: if you’re in a region that uses, for example the semi-colon deliminator. Please change the region settings on Windows to force the use of commas.The use of decimal commas (e.g. 12,7 instead of 12.8) is supported, but is not as extensively tested as decimal point notation.
Under the Bonnet
Much of the existing Nightscout instructions remain valid for this version. The official Nightscout instructions will be updated once more early adopters have reported back. VirtualHere works as before to enable USB IP to be utilised.Please carefully follow each line - you may want to print out the instructions to tick off each line as you go.
Setup Nightscout
Please consult the step-by-step directions for setting up a Nightscout site. In setting up Nightscout, you need to do the following steps:
- Create a mlab account and database.
- Create a Github account and a copy of the CGM-Remote-Monitor.
- Create an Azure or Heroku site.
- Configure your site’s connection strings (mongo information).
- Configure the API SECRET in Azure or Heroku.
- Configure the ENABLE variable with the value careportal (and any other plugins you wish to use; see example in note below).
- Deploy your site using the Github repository.
Directions for setting up the Nightscout site, beginning with the creation of the mlab database, appear here. Note: complete each step listed above. Once you have successfully created a Nightscout site (e.g., you see a black site showing time and dashes when viewing your site in a browser), return here to move forward.
Note: you do need to enable CarePortal to allow additional pump data, such as basal rates and bolus events, to reach Nightscout. I have my enable connection string set to enable careportal basal rawbg iob cage bwp.
You do not need to enter the Dexcom settings.
You do not need to enable the Medtronic Connect plugin.
Setup CareLink
Getting CareLink all set essentially means making sure everything works manually
Follow Medtronic’s instructions precisely when first attempting a pump upload.
Install Java if prompted and complete any system confirmation requests to enable.
Make sure you can manually upload data from the pump to CareLink.
Make sure you can manually select a CSV Report and download it.
Create Core Folders
Open File Explorer in Windows and double click on the SD Card (probably the D: or E: drive).
Click on the New Folder icon and type AutoCSV. (This is where we’ll throw the data around before uploading to Nightscout.)
 Click on the New Folder icon again and type data. (This is where we’ll ask Firefox to download the CareLink CSV file initially.)

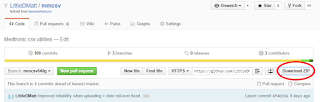
Download the Github files
From your browser, go to my mmcsv640g repository and click Download Zip.
 Extract the zip file to your SD Card (creating a folder called “mmcsv-mmcsv640g” and subfolders).
Install Git-Bash
Download Git SCM via https://git-for-windows.github.io/.
Install, accepting all defaults until you get to select terminal emulator. Select Use Windows’ default Console Window
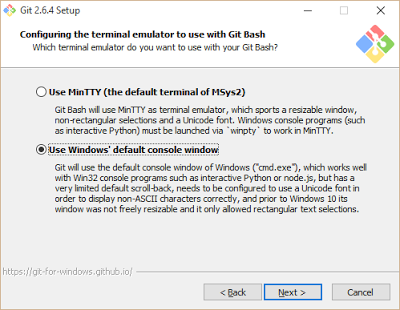
Complete the installation and close the installer.
Create Local Copies
From the mmcsv-mmcsv640g folder, copy the config.sh file to the root directory of the SD Card (e.g. D: or E:). Making a copy means that when you next update the mmcsv repository you still have your local settings retained.
config.sh contains default file locations and parameters, such as upload frequency, for use by the bash script. Assuming your SD Card is mounted as the D: drive it should read as shown below. You need to check/update the parameters in the copy of this file. The “api_secret_hash” below is the SHA-1 Hash of your API-Secret string. To generate this, simply type in your API-Secret key into a converter, such as this one. Please note and review the additional parameters towards the end of the file, compared to the older (<0.82) versions.
Install nodejs
Download and install nodejs (select the latest stable version).
Open a bash terminal window:
Start, All Apps, Git Bash
Change to the directory where you've downloaded mmcsv640g, e.g. by typing:
cd /d/mmcsv-mmcsv640g
(NB forward slash and drive letter d/...... to get things going in the bash shell)
Once you're sure you're in the correct directory, type:
npm install
You only need to do this ONCE, on installation, not for every run of the application.
If you get an error along the lines of can't find npm or nodejs, type:
export PATH=$PATH:'/c/Program Files/nodejs'
You might get a couple of lines of grumbling / advisories, but you shouldn't get a stream of warnings or errors.
Running the Application
Open a bash terminal window: Start, All Apps, Git Bash
Change to the directory where you've downloaded mmcsv640g, e.g. by typing:
cd /d/mmcsv-mmcsv640g Then type:
./mmcsv640g.sh "/d"
where /d is the root directory of the sd card, where you popped the updated config.sh file.
Want to go back to Firefox and Selenium?
The initial setup was really designed as a proof of principal and to deliver a very specific need for us as a family with a little one on the 640g. To see dozens of other 640g users take the step to their pumps connected to Nightscout has been amazing. I would recommend all users (old and new) try the updated solution. But if you really want to go back to Firefox and Selenium you can - just change uploader=0 in the config.sh file and follow the original instructions here.
Update: If you've landed here looking for Nightscout on your 600-series pump, thanks for stopping by :) The simplest way to get your pump on to Nightscout is to use the 600-series Android Uploader. Enjoy!
What an incredible effort by you Matt - and thank you for the late night support as we worked together to get it working. I installed using both methods and can highly recommend the second method which is easier to setup and importantly much easier to keep running.
ReplyDeleteAn impressive effort- now to checkout the data!
Hello Matt, have you had time to write the post for a Ras Pi setup as you mention at the beginning?
ReplyDeleteNot yet - sorry for the delay, been busier than I'd hoped recently... Follow https://www.virtualhere.com/oem_faq to get 90% of what I've set up. I have some tweaks running to check service and USB is connected running as a cron job which I'll post up once I'm happy I've trapped everything I've found so far. Without those tweaks, Pi usually runs without a hitch for a couple of days.
DeleteIt works fine....and now its all so simple. Nightscout Team, Mat, Tom and all involved...THANK YOU. We would never have been able to do this with out you guys. Now looking into the NightWatch from Stephen Black
ReplyDeleteGreat stuff - thanks for your feedback!
Deleterpm install does no work! :
ReplyDeleteCommand not found
when I type : export PATH=$PATH:'/c/Program Files/nodejs' nothing happens.
Sorry to hear that: that's the first issue of this kind I've heard of (apart from when node.js hasn't installed properly).
DeleteNot sure if it's just a typo in your comment, but the required command is 'npm install', not 'rpm install'?
Assuming that's not the problem, please check the following:
- once open your bash terminal window has a little black and white c: in the top left of the window bar?
- open a regular windows cmd window (type 'cmd' under the Start menu if you can't find it) and type 'npm' and the last line of output should list the installed version and installed location
- after you've install npm and Git Bash you *might* need a reboot to get your path up-to-date (I doubt it, but, it'll do no harm)
I hope some of that helps.
hi, in the end I have this error:
DeleteCBG
E:\mmcsv-mmcsv640g\node_modules\util-extend\extend.js:1
(function (exports, require, module, __filename, __dirname) { 212
^
SyntaxError: Unexpected token <
at exports.runInThisContext (vm.js:53:16)
at Module._compile (module.js:373:25)
at Object.Module._extensions..js (module.js:416:10)
at Module.load (module.js:343:32)
at Function.Module._load (module.js:300:12)
at Module.require (module.js:353:17)
at require (internal/module.js:12:17)
at Object. (E:\mmcsv-mmcsv640g\bin\args.js:2:14)
at Module._compile (module.js:409:26)
at Object.Module._extensions..js (module.js:416:10)
same idea??
Hi there, did you get a clean npm install?
Deletei.e. in the bash window type
cd /e/mmcsv-mmcsv640g
npm install
You'll get some WARNing messages but nothing more serious than that if all's well. Could you try that first please? Thanks.
yes i did clean npm install.
Deletebut it does not work, does not load the data on azure.
The csv donwload is ok (i have the file in the folder: AUTOCSv ). The problem is the upload.
If you hop to www.facebook.com/littlet1d and message me there, can you attach or paste in your config.sh file please? Many thanks
DeleteHi Matt, Thanks for your efforts for us NS users. I'm trying to get NS working with my laptop as the uploader before going out to get a mobile phone.
ReplyDeleteI guess the program is working after going through all the steps above, but the returned line in Gitbash is as follows (repeats every few minutes):
Using CareLink Uploader...
./mmcsv640g.sh: line 115: /c/Users/matt/Nightscout/csv/mmcsv/uploader/CareLinkUploader: No such file or directory
Is this because the values in the copied (to root directory) config.sh file haven't been updated by me? If so, in Windows explorer I double click on the file, a dialog box flashes up and then goes away, but no editor opens. Is there a specific program I should use to edit the copied config file?
Hi Mike,
DeleteThanks for your comment. Yes you need to edit that file. Right click on the file icon and select open with and then choose a simple editor like notepad. You then change the original values like directories and Nightscout details to your own unique settings.
The quickest, simplest way of getting to Nightscout on the 600 series is to use Lennart's Android uploader. It's very easy to install and use. You might want to look at that first? It's at the bottom of the post.
Good luck with either solution!
Cheers. I'm setting up NS to work on a PC in the bedroom as the uploader for night time, and then will migrate to an Android phone and use Lennart's Android uploader.
Delete